
Wine from grapes
adminMany people have attempted making wine these past few months with the hope of the same taste and quality of wines available from wineries. Many people were left disappointed however, even when following the recipe to a tee.
There were quite a few problems with these lock-down wine recipes which includes using the wrong raw materials, consumables, techniques and having limited knowledge from a biological/scientific perspective. Winemaking is part science – part art, and it takes some skills to making the perfect wine. However, there are some tips and tricks to make a decent wine from home – and this is what this article is all about!
Choosing the right Raw Material
Cabernet Sauvignon, Shiraz, Merlot, Chardonnay, Sauvignon blanc and Chenin blanc are not just random names given to certain wines, these are actual wine grape varieties, each of them being unique in taste, aroma, colour and morphology.
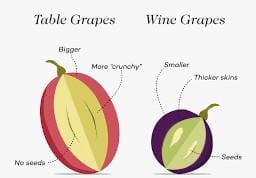
The grapes we are generally familiar with, are table grapes. These grapes are available at your general grocery store. There is a big difference between table grapes and wine grapes. Table grapes are grown to be physically eye-catching, they are much bigger in size, has a thinner skin (lower skin to juice ratio), a lot of pulp and less juice compared to wine grapes. Most table grape varieties are seedless which is preferred by most consumers. Wine grapes are almost the exact opposite. Wine grapes are much smaller in size, they have a higher skin to juice ratio, a lot of juice, high acid concentrations and always have seeds. Note that all the flavour, colour and aroma compounds are present in the skins of the grapes, which means the higher the skin to juice ration, the more flavour and colour can be expected in your wine.
Grape juice options:
The ideal grape juice to use is juice from actual wine grapes. At Distillique we have made it possible by stocking Shiraz, Cabernet Sauvignon and Pinotage juice to be able to make proper red wine. However, since it is a seasonal product, this juice is not available throughout the year you might have to look at different options.
Any preservative free white or red grape juice will be fine for making white and Rose’ wines. Note that you will never be able to make a red wine from table grapes because of the low skin to juice ratio. You can use fresh table grapes, but it will become very expensive since a lot of grapes are needed to obtain a small amount of juice. Keep in mind that store bought grape juice are made from table grapes, which means that your finished wine will not be as aromatic and complex as it would have been if you used wine grapes.
Another important thing to note is not to add any sugar to the grape juice. Grapes naturally contain a lot of sugar and one can easily expect a wine with an alcohol content ranging from 10% abv up to 16 - 17% abv. Adding additional sugar will firstly, dilute the flavour of your wine and secondly, make it extremely alcoholic, resulting in an unbalanced wine.
Choosing the right consumables
The two most important consumables in wine production is yeast and nutrients. There are many yeast strains available and each of them is unique, making them ideal for certain types of raw materials, styles of wine etc.
Bakers and brewers’ yeast were the only known yeast strains available by most South Africans during lockdown, and even though they ferment, turning the sugars into alcohol, they are not ideal for wine production. Wines are known to be fruity, crisp, fresh and perfumey, characteristics that bread yeast will not be able to contribute during fermentation, instead, a bread like aroma will always remain in your final product. At Distillique, yeast strains for specific types of fruits/wine styles are available, contributing aromas and flavours such as stone fruit, tropical fruit, red berries, dark fruit etc. If you would like to know more about the different yeast strains available, please have a look at our article on “selecting the right yeast strain”.
The second most important consumable necessary for a successful fermentation is yeast nutrients. Yeast nutrients have three important functions:
- Provide the necessary energy needed for population growth (to produce even more yeast cells).
- Provide the building blocks for compounds produced by yeast during fermentation (this included ethanol, flavor and aroma compounds and many other fermentation related compounds).
- to maintain yeast cell health.
Without yeast nutrients, the yeast cannot preform optimally leading to sluggish fermentations as well as undesirable aroma compounds due to yeast stress caused by nutrient deficiencies. If you would like to learn more about the importance of yeast nutrients, please have a look at our article on “the importance of yeast nutrients”.
Using the Right Winemaking Technique
Red, white, rose, sparkling and fortified wines are just a few main categories with very different wine making techniques, and within each category, even more variations exists. What I mean by that is , not all white wines are made the same for instance. That is why winemaking is an art, because small difference can result in major differences. It is impossible to mention all of the wine techniques for the different styles of wine in this article, so, of you are interested in learning more complex techniques, have a look at our W12 – fruit wine making workshop. Below is a simple recipe that can be used to make white wines and / using our red wine grapes juice. The dosages in this recipe is given in grams per liter, which means you can multiply the dosage rate by the volume in liter.
DISCLAIMER: Distillique does not believe in providing and selling recipes, as this goes against the Craft of producing your own products. The recipes we share have been sourced from clients/ experience and other sources, and as such, Distillique takes no responsibility and makes no guarantees regarding the quality, accuracy or safety of these recipes. Recipes are used at own risk, and are for the purpose of experimentation, inspiration and guidance.
Step 1: Choose a raw material
The first step is to choose the source your grape juice.
Step 2: Inoculate your Juice
Once you have decided on a suitable yeast strain. Add 1g/L of Wine yeast directly into your grape juice and stir.
Step 3: Aerating your Juice / wine
Aerate your juice/ wine by vigorously shaking your fermentation vessel for at least 2 minutes directly after you have added the yeast. If you are working with larger fermentation buckets – you can use a paint mixer or pour back and forth between two buckets (make sure both are clean). Oxygen is important for the production of unsaturated fatty acids and sterols which are important components within the yeast cell wall to ensure yeast health.
Step 4: Closing Fermentation and Allow for CO2 Release
Close your fermentation vessel with a lid containing a Fermentation Lock. Remove the red cap on the Fermentation Lock or Bubbler, and fill it with water to the indicated mark. Replace the red cap onto the bubbler and place the Fermentation vessel(s) in a room that has an ambient temperature of between 22-25°C.
Step 5: 1st Nutrient Addition
After the first 12 hours - your juice should already show signs of fermentation (the formation of Carbon Dioxide bubbles) - if this starts earlier, that just means your yeast is active and happy.
Add yeast nutrients at a dosage rate of 0.5 g/L. Aerate your wine for the second time by vigorously shaking your fermenter for at least 5 minutes. If you are working with larger fermentation buckets - you can use a paint mixer.
Step 6: Fermentation Monitoring
Monitor the progress of your fermentation by noting the Brix value daily with a SG Hydrometer. The aim of fermentation monitoring is to make sure that your sugar concentration decreases exponentially each day. If your sugar concentration does not decrease within the first three days or decreases slowly, that means that your fermentation is most likely stuck. Please read our article on how to restart stuck fermentations.
Step 7: Nutrient addition
Once the fermentation is 1/3 way fermented, add another 0.5 g/L of yeast nutrients.
Step 8: Finish off the Fermentation
Allow your wine to ferment until there is no more sugar left. If you are using a SG hydrometer your Brix should be 0. If you do not have a SG Hydrometer – taste your wine – if it is still sweet that means it has not yet completed fermentation.
Step 9: Racking
After fermentation is complete, let the fermentation stand for at least 2 days. To speed up this process, place the fermentation in a cold area of your house, or if possible, in a fridge (not freezer). You will notice a yeast sediment layer forming at the bottom of your fermenter - this is the dead yeast cells that drop out of suspension.
Transfer your wine into a second and clean container that can be sealed airtight. You should transfer the fermentation using a syphoning tube, but be careful not to disturb your yeast sediment layer - you do not want any of the yeast sediment transferred to your new container.
Step 10: Oak Ageing (optional)
Red wines and some white wines such as Chenin blanc and Chardonnay are mostly oaked in French oak barrels. These oak barrels adds additional flavor and aroma compounds, woody tannin and allows for micro-oxygenation, softening the wine. These barrels are quite expensive and not easily found in small volumes. Toasted oak chips can be used as an alternative for home-winemakers.
Add about 2,5 grams of oak per liter of wine in your container. If you do not notice a change of flavor after a month of ageing, add another 2,5 grams and allow to stand for at least another month. After the first two months of aging, taste your wine to determine whether you are happy with the amount of oak flavor and aroma, if not, allow to stand another month or until you are happy with the amount of oak flavor.
Once you are happy with the degree of oak flavor and aroma, syphon your wine into another and clean container using a straining cloth and funnel to separate the oak chips from the wine. If any sediment has formed - do not allow it to be transferred into your new container.
Step 11: Adjustments before Bottling
You might require to make a few adjustments before bottling. These adjustments will help improve the taste and the stability of your wine.
Adjust the Acidity of your Wine (optional):
If your wine tastes “flat” or lacks freshness and character – you might need to add some fruit acid. Dissolve 0,5 gram/L of acid in a small amount of wine. Once all the acid is dissolved - add it to the rest of your wine. Repeat until you are happy with the acid content.
Adjust the Tannin content in your Wine (optional):
Tannins are phenolic compounds responsible for the bitter/astringent taste in red wines. Tannins are derived from the skins and the stems of red grapes and are extracted during fermentation. Ageing red wine in oak barrels also imparts tannins into your wine to some degree.
Since this grape juice does not contain any skins - it will not contain a lot of grape derived tannins and you might be required to add additional tannins if you would like a more astringent wine. Distillique
Step 12: Fining/ clarification (only applicable to white and rose wines)
If you do not want to go for an oaky wine, and you want to bottle your wine directly after fermentation, you will notice that your wine is quite milky. This is suspended yeast cells and other fruit delivered solids. One method of clarification is though cold crashing. This process involves cooling your wine close to 0 degrees Celsius for a couple of days. The cold temperature will promote flocculation and the yeast cells will settle at the bottom of your container.
A quicker and more effective method is by using fining agents such as Kieselsol and Chitosan. These fining agents will react with the molecules causing the turbidity and clear your wine completely.
First use KIESELSOL (0.5ml to 1.5ml per liter wine/beer). Make sure the wine is not fermenting anymore decant or syphon wine/beer into a container and discard sediment. Shake wine to ensure all CO2 gas escape. Then add the Kieselsol while gently stirring the wine just enough to distribute it throughout the wine. Let stand for 1 hour.
Then use the CHITOSAN: (1.5ml to 3ml per liter wine/beer). Dissolve the Chitosan in an equal amount of hot (but not burning) water (i.e. 30ml Chitosan and 30ml hot water for 20L wine) and gently stir into wine just enough to distribute it throughout the wine. Let stand for between 12 and 24 hours.
Lastly syphon the clear wine off without disturbing the sediment at the bottom of your fermenting vessel.
Do not use fining agents with red wines since you have the risk of colour loss.
Step 13: Sterilisation
Sterilise your wine by adding 0.2 grams of sodium metabisulphite. Sodium metabisulphite is an antimicrobial and antibacterial agent which serves as a preservative. Dissolve the sodium-metabisulphite in a little bit of wine first and then add it into your container.
Step 14: Bottling
Once you have made all of your adjustments - it is time to bottle your wine. Transfer you wine into clean wine bottles and seal tightly using a cork and PVC capsules or bottle sealing wax
If you would like to learn more about the winemaking process and in much more detail – please consider our W12: fruit wine making course.